N1NKM's solution to flickering LED lights!
N1NKM's  HOMEBREW gallery! |
|---|
AC converter V2.0! |
NOTE to slow connection users: this page has several 80K+ pictures, which may take a few moments to load. Please be patient.
| N1NKM's HOMEBREW gallery! |
|---|
AC converter V2.0! |
NOTE to slow connection users: this page has several 80K+ pictures, which may take a few moments to load. Please be patient.
Ever buy one (or more) of those inexpensive LED Christmas lights, only to discover that they FLICKER like crazy? I bought 6 sets for $1.74, each, in 2011. When I plugged them in, I thought, "NO WAY!" The 60Hz flicker was absolutely awful! These sets are wired with 1/2 of the LEDs in one polarity, 1/2 in the other. That means I couldn't just power them with DC... so this project was born! :) (NOTE: Updated to V2.0 sometime after 2020) This site contains some of the V1.0 pics, but I've added the much better V2.0 info as needed.
| Top view of the V2.0 de-flickerer |
|---|
 |
| Closeup of the V2.0 electronics |
|---|
 |
Here is a closeup of the 555 oscillator system, power transistors, filter and output caps. This is V2.0, where I've added some IMPORTANT safety features, like an inline fuse, and a neon lamp that lights if the fuse blows. I've also redesigned the power converter circuit with better transistors, heatsinks, and overall circuitry.
| V1.0 Unit powered-up & running a light set! |
|---|
 |
Here is V1.0, doing what it was designed to do! :) With the flicker rate at 400Hz,
it is no longer visible unless you sweep your eyes rapidly across the lights.
SUCCESS! :)
NOTE: V2.0 made little change to the appearance of the lights, but made this unit much safer and more efficient.
| Schematic of the V1.0 de-flickerer |
|---|
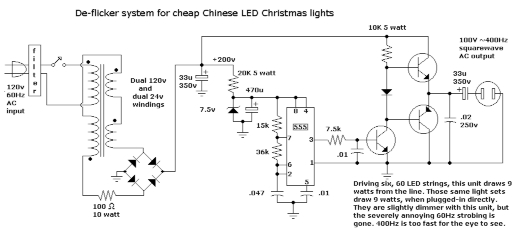 |
The small caps on the input and output of the power stage were necessary to eliminate RFI.
The transistors used in V1.0 were salvaged from computer monitors. They are all rated at 200v
The computer power supply case had a nice RFI filter already built-in, which I included.
| Schematic of the V2.0 de-flickerer |
|---|
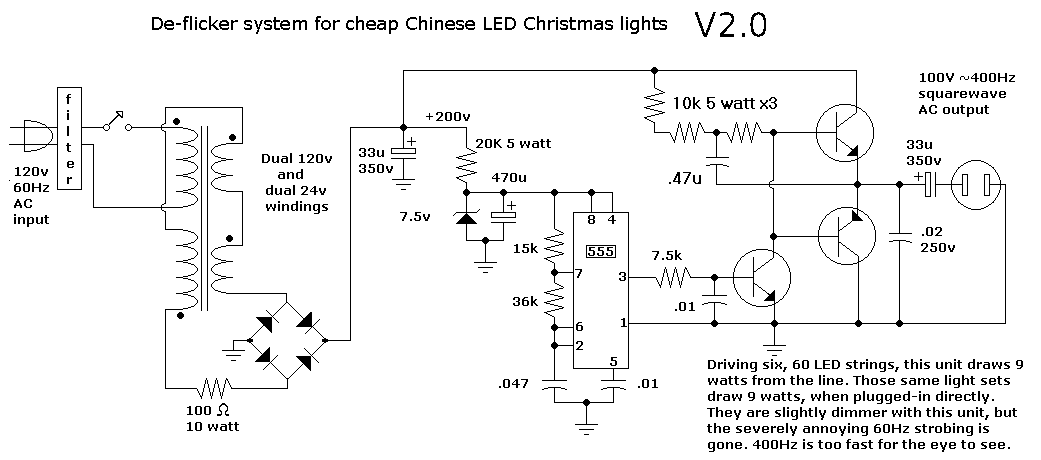 |
The new V2.0 includes better transistors, (300V rated, ceramic case, higher current) and changes to the circuitry to improve performance.
The end result is a more reliable and safer unit.
The heat sinks ensure that these ceramic transistors run much cooler than the old ones did.
V1.0 of this project was completed on 1/7/2011. V2.0 upgrades made after 2020
This unit has been in use every Christmas, since. :)
*** DISCLAIMERS ***
(Keep the lawyers happy.)
*ALL* Information presented here is done so without warranty or guarantee of any kind. Author assumes no responsibility for the use or inability to use this information. Author also assumes no responsibility for the ability or inability to complete the project, above. This project uses potentially *LETHAL* voltages! If you are not sure of what you're doing, ask an experienced friend to help. ALWAYS "pull the plug" and ground the caps to make sure there is *NO HIGH VOLTAGE* when working with this unit! Always attach the cover to keep hands away from dangerous voltages.
This information is presented as educational information only. No guarantee is made as to its fitness for any purpose. All risk is assumed by the person who choses to use this information. While the author's experience indicates that this proceedure was effective, any attempt to build/modify these devices IS AT YOUR OWN RISK. Extreme care must always be excercised, this is at the builder's SOLE RISK.